Scalable React Architecture: Directory Structure Best Practices
A Developer's Guide to Organizing React Projects

noteUpdated October 2025: This article was originally written in 2019 but the architectural principles remain relevant for modern React development. These patterns work with React 19, Server Components, and modern build tools like Vite and Next.js.
The Importance of Architecture
React’s popularity comes from its approachable learning curve and intuitive APIs. But here’s the thing — if you don’t pay attention to structure from the start, even a simple React app can become an unmaintainable mess.
When I transitioned from freelancing to my first job, I had built some projects but didn’t really understand architecture beyond what I’d pieced together from online tutorials. Working on large-scale applications changed that quickly. Being part of a team meant my code affected others, and suddenly I was a lot more conscious about how I organized things.
I dove into GitHub repos, articles, and books. The more I worked with React at scale, the clearer it became: The key to a robust, scalable, and maintainable React application is architecture.
This principle applies to any application, but with React’s flexibility, it’s easy to end up with spaghetti code if you’re not intentional about structure.
The good news? The organizational patterns I’m sharing here have stood the test of time. They work with class components, hooks, and even modern features like Server Components — because they’re fundamentally about separation of concerns, not specific React APIs.
Initial Project Structure
Let’s quickly take a look at the setup and then I’ll walk you through it and try to explain why it is structured that way.
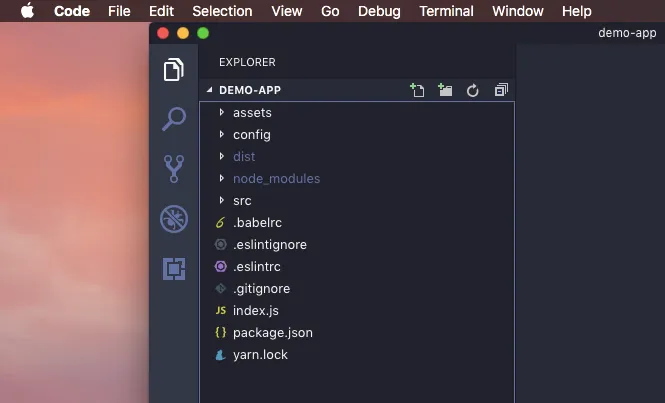
So the root of the project looks something like this :

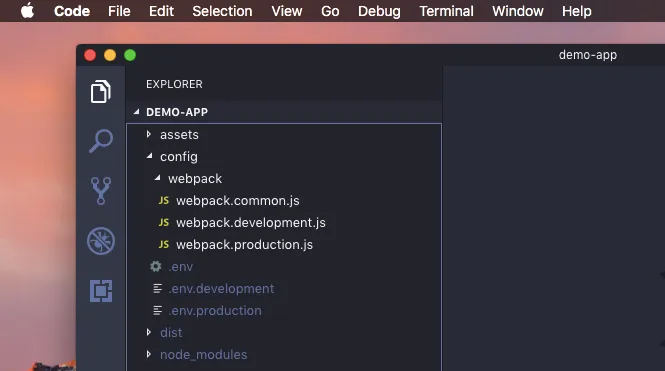
And the src directory ( which will contain all the source code for our application, ofcourse ) is structured like this :

The first thing you might notice, and wonder maybe — and if you don’t, I’d recommend taking a look again — that we have two directories named config in our project. No, this isn’t by mistake! It has a[n extremely] simple reason.
Two config directories for a single web application?! Why though??
The config directory at the root contains all the configuration files related to build — like your bundler config (Webpack, Vite, etc.), environment files, and other build-related settings.

You might notice it’s nested — the build configuration lives in its own directory. This makes configurations more organized and easier to manage. It might seem trivial, but as your application grows and the build process becomes more complex, having a well-organized config directory is a lifesaver.
The last thing you want during a production deployment is hunting through a mess of configuration files!
The other config directory inside our src folder is for configurations related to your application — runtime configurations. This might contain JSON files or other data that shapes your app’s behavior or capabilities. You might not need this for every project, but I’ve found it useful in most applications I’ve built.
But wait, what about the resources and assets directories? Aren’t assets also a part of the ‘resources’ for our react application?

The assets directory is for images and other media files — simple as that.
The resources directory is for data that your application needs: constants, static data, configuration objects — anything that doesn’t have much logic associated with it. You can also add small utility functions here to format or transform that data before it’s used in your components. Trust me, this separation makes your code significantly cleaner.
noteI would like to make a slight change in the above statement as I revisit this article after all these years. You can also put your utility functions in a directory called
utilsor something. Or maybe if you still use this directory and some of the utility functions are very specific to the stuff inresourcesthen perhaps just keep those definitions here.Bottom line is: You know your application the best. And logical grouping makes things intuitive more often than not.
This directory might also contain data that’s occasionally fetched, cached, and updated—processed before being consumed by different parts of your application.
Structuring Pages and Components
Here’s the interesting part. This approach combines patterns I’ve seen in other architectures with my own practical experience, and it’s served me well across many projects.
Let’s say our application has a home page, a profile page, and a third page (we’ll call it “other page” for this example). Here’s how the directory structure looks:
-- src
----- components
----- config
----- pages
--------- home
----------- index.js
----------- index.scss          // Mandatory sass file - I just wanted to make this look realistic!!
--------- profile
----------- index.js
--------- other-page
----------- components
----------- index.js
----- resources
Notice how each page has its own directory with an entry point? And how “other-page” has its own components folder? Why another component folder when we already have one in the src root?
The “Branching” Structure Explained
I call this the “branching” structure. Each page has:
- Its own directory
- Its own components (used only in that page)
- Its own styles
- Any other page-specific code
If a component is shared between two or more pages, it goes in the root components directory.
Here’s why this matters:
Let’s say you decide to remove the “other-page” feature. What do you do? Spend hours tracking down dependencies, removing code, fixing broken imports?
Nope. You delete the directory and remove its reference from your router. Done.
Nothing breaks. Everything is independent — even when components are connected, they’re not tightly coupled. This principle applies to any application, not just React.

You might be thinking: “But my app is complex! Everything’s interconnected! We share code everywhere!”
That’s exactly why this pattern works. Shared code goes in the root components directory. Page-specific code stays with the page. The “bridges” between features are just imports — they don’t create tight coupling.
This is a simple example, but the principle scales to applications of any size.
Leveraging Layout Components
Add a layouts directory to src (or put it in components, whichever makes more sense to you). This contains layout components that wrap multiple pages.
For example, say our app has a navbar and footer on every page. Instead of importing them into each page individually, create a Layout component that renders them once:
// Home page
<Layout>
  <div>Welcome to the home page!</div>
</Layout>

// Profile page
<Layout>
  <div>User profile content</div>
</Layout>
And in the Layout file:
const Layout = ({ children }) => (
  <>
    <Navbar />
    {children}
    <Footer />
  </>
);

export default Layout;
Much cleaner, right? Even this website uses a layout component — it’s that fundamental to good architecture.
What About State Management?
I haven’t forgotten about reducers, sagas, services, and action creators! That’s covered in part 2 of this series, where we dive into organizing state management and side effects.
This first part focuses on the foundational directory structure — the patterns that work regardless of whether you’re using Redux, Zustand, or just React’s built-in state management.
Conclusion
Good architecture isn’t about following rules blindly — it’s about making your codebase easier to understand, maintain, and scale. The patterns here have worked across countless React projects, from small apps to large enterprise applications.
Start with these principles:
- Separate build config from runtime config
- Keep page-specific code with pages, shared code in root components
- Use the branching structure for easy feature removal
- Leverage layout components to avoid repetition
These aren’t just React patterns — they’re software engineering fundamentals that happen to work beautifully with React’s component model.
Happy building! Cheers! 🎉


